Binoculars – Understanding, Buying, Using
Numbers on Binoculars
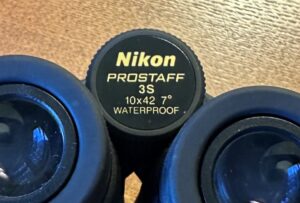
All binoculars have two numbers on them which are separated with an ‘x’. Often these numbers are on – or close to – the focus dial that is between the eye pieces. But different brands put these numbers at different places, so look all over your binoculars until you find them. These binoculars are 10×42. What do these numbers mean?
The 10 of 10×42. 10 represents the magnification. When I look at a bird through my 10×42 binoculars, the bird will appear to be 10 times closer to me than it will appear with just my eyes. The higher the number, the closer the bird will seem to be, and the closer the bird is, the more detail you will see. This sounds great, but the higher that number is, the smaller your field of vision will be and the heavier the binoculars will be. Both can be problems when birding.
What is field of vision? It is how much you actually see when looking through your binoculars or through your eyes. When you are looking through just your eyes, you automatically have a panoramic field of vision. You can concentrate on just one small area, but you cannot eliminate everything else. When you look through your binoculars, you have a much smaller viewing area – field of vision – than you do with just your eyes. The magnification of your binoculars brings the small area (field of vision) closer to you which enlarges it, but at the expense of how much else you see. Binoculars pinpoint things. The field of vision through binoculars is quite small in comparison to the field of vision (all that you see) with your eyes.
The higher the number, the smaller the field of vision. That means it will be harder locating a single small object – like a bird. So, although my magnification number of 10 does not allow for a more close-up and detailed image of the bird like I would have if this number was 12, the 10 does provide a larger field of vision in which to actually find the bird with my binoculars. For example, you see a small bird with your eyes in a tree that is 40 yards away, and you want to look to look at it through your binoculars. If your binoculars have a number of 11, 12, or higher, then trying to pinpoint that bird can be more difficult.
I recommend the first number be 10. If you use binoculars with a magnification number less than 10, just keep in mind you will see a smaller, less detailed bird because you will see more of the area around the bird.
I would caution going larger. If you are at 12, or higher, involuntary movements of hands and arms (and even breathing) can cause binoculars to vibrate or shake, distorting the viewing. I had a nice pair of binoculars with a magnification number of 12 which gave me an image of a bird with wonderful detail. The downside was I had to hold my breath or prop my elbows on a fence or the hood of the car every time I looked through them. Binoculars with magnification numbers 12 and higher are often best used with a tripod.
The Arithmetic for Magnification. If I am looking through my 10×42 binoculars at a Red-tailed Hawk perched in a tree that is 40 yards (or 120 feet) away, this hawk will now look like it is 4 yards (or 12 feet) away.
To determine this, divide the distance number by the magnification number.
In this case, 40 yards (distance) divided by the magnification number of 10 equals 4.
40 yards ÷ 10 = 4 yards
And how many feet would that be? There are 3 feet in 1 yard.
4 yards x 3 feet = 12 feet
When I use just my eyes, this hawk is 40 yards away. When I look at this same hawk through my 10×42 binoculars, it will look like it is just 4 yards or 12 feet away. When looking at small identification marks, this is important.
The 42 of 10×42. 42 is the diameter in millimeters of the objective lens within my binoculars – 42mm. The lens is what is responsible for the quality of the image you see when looking through your binoculars.
This number also indicates how much light your binoculars can gather. More light means a brighter view which means a brighter image. This is a necessary consideration when using binoculars at dusk and dawn or in shaded areas.
The larger the number, the brighter and sharper the bird and its details will be. This sounds great because many birds you will want to look at are within shrubs and trees – shaded areas. It makes sense – the brighter, the better. However, the more light your binoculars allows in (the higher this number is), the more complicated the lens has to be, and that means more weight. When holding binoculars up to your eyes for minutes at a time, weight matters.
Two different pairs of binoculars with identical numbers do not always produce identical images or brightness levels. Prism types, lens elements, component quality, and optical coatings all affect brightness and sharpness. In my experience, reliable brands are best and you do get what you pay for. Inexpensive binoculars might not be a bargain. When I buy binoculars, I buy recognized, reputable brands and get the best ones I can afford. A lens with a number 42 works well for me and I know that if I am buying a reputable brand, I can trust the quality of the lens system.
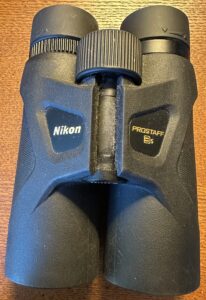
These are the binoculars I use when I am sitting at my desk at home. My windows overlook our backyard feeders and birdbath, so I keep these binoculars on my desk at all times. These binoculars are Nikons and I like them. I have also had Viking and Bushnell and liked them just as well. I am not recommending a brand, but I am recommending whatever brand you are considering, a good place to begin is with a pair of 10×42 – like these. Then try other models with different number combinations and compare.
This is important: Focus on something at the back of the store to check how the field of vision works for you. And hold them up to your eyes for at least 30 seconds to check how heavy they become.
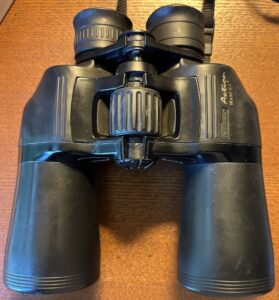
The photo to the right shows Cleon’s binoculars and he likes them. They are 16 x 50 and give a very different view than mine at 10 x 42. He feels the only downside is that he has a difficult time locating a bird through them that is less than 20 yards away – compared to mine, he does have a much smaller field of vision. But when he does locate a bird with these binoculars, the view of it is terrific. He can practically see each and every individual feather. I cannot use these binoculars. No matter how hard I try, the field of vision is too small for me to locate a bird at any distance. These binoculars are also too heavy for me, and I have to hold my breath or prop my arms on the hood or door of the car in order for them to be steady. These are not the binoculars for me.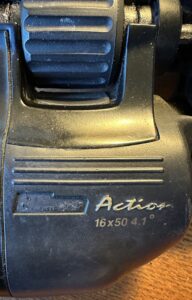
The width/span of binoculars is very important. And do you wear glasses? The width/span refers to how wide the binoculars will spread to accommodate how far apart your eyes are on your face. We discovered Cleon has wide-spaced eyes. He never knew this and I never noticed. We found that out when he tried to use my binoculars and found they would not spread wide enough for his eyes.
It also makes a difference whether or not you wear glasses, and if you do wear glasses, if you have bifocals. Some binoculars have eye piece rims or cups. These rims or cups can vary in length, but often they can be adjusted. Some binoculars do not have any rims at all.
It would be my advice to ONLY buy binoculars you have tried out. Everyone’s eyes, and the position of their eyes, are different. Try binoculars with and without these rims/cups and see what works best for you. You need to actually look through a pair of binoculars to make sure they are right for you and that using them is easy and comfortable.
To calibrate binoculars:
1. Grasp the binoculars with both hands and put them up to your eyes. Move them in or out to accommodate the placement of your eyes.
2. Take the binoculars down from your eyes and look at both eye pieces. One of them (almost always the right one) will have a dial or lever – this is not the dial located between the eye pieces, but a dial or lever right on one of the eye pieces. (Note that some Swarovski models do not have this dial on either lens. See the pictures at the end of this section for instructions.) Underneath or on this dial or lever, you will see small symbols: + . 0 . – These are the most often used, or there will be similar symbols or numbers. See the photo below on the left. Often these symbols are raised, so it might be easier to feel them than see them. This is the lens you will adjust to calibrate the binoculars to your eyes.
3. With the palm of your hand (or lens cover), cover the big end of the other lens – the one without the dial or lever. Keeping your hand over the big end of that lens, put the binoculars back up to your eyes. You should only be able to see through one lens – the lens that has the dial or lever. Aim the binoculars at a distant tree, building, or anything large and distant.
4. Still looking through that one lens, move the dial or lever on that lens until that large object is clear and in focus.
5. Remove your hand from the end of the other lens, grasp the binoculars with both hands, and put them back up to your eyes. Looking through both lenses at the same distant object, use the dial or lever that is in between both lenses to fine-tune the focus.
6. Look at the symbols that are just below the dial or lever that is on the first lens you focused. Notice what the setting is and memorize it. As long as your eyes do not change, that setting should always calibrate your binoculars to you. Sometimes your binoculars will get bumped as they are transported and that dial might move. Check it periodically. To focus each time you use the binoculars, only use the lever or dial that is between the two lenses and move that as needed until what you are looking at is in focus.
This is the right eye piece of Cleon’s binoculars. Notice the symbols: + . 0 . – Below these symbols is a solid white dot. When Cleon is looking through just this lens to calibrate, the dial above these symbols is the one he turns until whatever he is looking at is in focus and sharp. Before he began to calibrate, he lined up the 0 with the solid white circle. The photo on the right was taken after he calibrated. Notice where the symbols are now in relation to the solid white dot. This is how they must be on this pair of binoculars every time Cleon uses them so that whatever he is looking at through the binoculars is as sharp and clear as possible. When the symbols and dot are lined up in this manner on these binoculars, they are perfectly calibrated for his eyes. Each time he uses them, he checks to make sure the solid white circle is correctly lined up just to the left of the right – . Then all he has to do to use these binoculars is to locate whatever he wants to see in the binoculars and use the center dial between the lenses to focus the image. He never moves the dial on this calibrating lens again unless his vision changes or it has been knocked out of place.
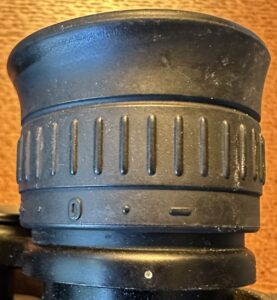
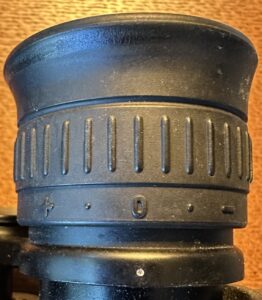
← These are the binoculars I now bird with. They are 10×42 Swarovskis and I love them. They are expensive, but for me, they are worth it. The photos to the right show the dial between the eye pieces. The top photo shows what the dial looks like when you purchase them and when you use them. The Swarovsky system of calibration on some of their models differs from the Nikons, Vikings, and Bushnells I have used. Instead of two dials – one most often on the right lens to calibrate and a second dial

between the lenses to focus, there is only one dial on this pair which does both. It is between the lenses. The top photo shows the right lens is ready to be calibrated. To get to this number scale (instead of symbols), I grasp the center dial and pull it up. It will click when the numbers are exposed. Now this dial can be used to calibrate in the same way as all binoculars are calibrated – looking through just one lens – on this pair, the right lens. The bottom photo shows the binoculars already calibrated to my eyes and ready to focus on a bird. When I finish calibrating, I push the center dial back down in place – it will click, and I can feel it snap into place. The right lens is now locked into this calibration. Notice where the white triangle is related to the white circle – this is where they must be positioned when I am using them.
To focus on a bird with these binoculars, I just raise them, look through with both eyes and move the same center dial to focus. I never have to recalibrate unless my vision changes. And as Cleon does, each time I use these, I check to make sure the triangle and circle have not moved.
How to Locate a Bird with Your Binoculars:
This takes practice – a lot of practice. So be patient. And practice on a bird that is closer to you and not hidden – a robin is always a good choice. If you are near a pond or lake, you can also practice on a Mallard, Canada Goose, a Great Blue Heron, or any large duck or wading bird.
1. Locate either the bird or a fairly small area where you think the bird might be – for example: the top left portion of a large shrub, close to the top of a tree, on the edge of a roof or window ledge, resting on a lake or pond.
2. Stare at either the bird or your ‘spot’ and slowly raise the binoculars to your eyes – never move your eyes or head – just move the binoculars. Place the binoculars at your eyes.
3. Use the center dial to focus. Since you should already have your binoculars calibrated, only use this center dial. Turn it both ways until the bird or spot is in focus. This takes practice and with practice, you will be able to move your binoculars to your eyes and focus faster and faster. You can turn yourself into a quick-draw expert! Just remember – NEVER move your eyes or head – just the binoculars.
However, if you are like me, no matter how still I think I am holding my head and eyes, evidently, I move just a bit. And I am consistent. My bird or spot is always just a bit left and up. Once I have my binoculars at my eyes and if the bird is not there, I correct ever so slightly left and up and if the bird is still there and has not flown, then it is in my field of vision through the binoculars every time. This is just like aiming anything at a target – we are all a bit different with different unconscious movement. Pay attention to what you are doing and practice, practice, practice. It should not take too long before you are able to get a bird or spot within your binoculars’ field of vision quickly.
Once you have mastered looking at a robin, try more challenging songbirds – active birds like cardinals and Blue Jays. Then try the smaller birds like House Sparrows, House Finches and goldfinches. And when you feel you are really good at this, try any bird in the warbler family – they will make you humble.
The next step is to focus on birds that are flying. Again, robins are good choices but if you struggle with this – and this was a hard skill for me to master – your best birds to begin with are big ducks, geese, and Great Blue Herons. Canada Geese are just about everywhere, and they are big and like to fly in a group of at least two birds to several dozen so you have a big target.
Focusing on birds in the sky is tough because there is just nothing to aim at but a direction and a whole lot of blue, gray, or clouds. Small birds like the swallows and swifts are difficult because not only are they just 4-5 inches long, they can twist and turn on a dime. I rarely use binoculars with them – I always try to ID first with just my eyes. Once you learn to get a flying bird within your binoculars, with the exception of swallows and swifts, they are fairly easy to follow. Again, this is my own personal quirk, but I have learned that if a bird is in full flight – travelling at its full speed – I really cannot get my binoculars up to my eyes fast enough capture the bird in my lenses, so I aim in front of it so the bird flies into my binoculars’ field of vision. This takes much practice, but once you understand how your own eyes, arms, and brain works, you will be able to focus on flying birds most of the time. And as before – look at your spot and move your binoculars, not your head and eyes.
The other problem with flying birds is focus. With the small songbirds, if your binoculars are not focused, you will never find them in the sky because there is too much blurriness. I never waste my time trying to get distant flying songbirds in view with binoculars – it is just too difficult for me. But if a songbird is 50 yards or closer to me, particularly if it flying perpendicular to me, I am now fairly successful. I generally do not try using binoculars on birds flying away from me when they are more than 20 yards away because again, this has proven quite difficult and if I am lucky enough to get one in focus, all I often see is a bad view of the tail and maybe just a bit of its back. Unless there is a colorful rump, there is just not enough for me to make a certain ID. So, use common sense with flying birds. The point is to watch a bird in flight – how it flies and its behavior – and you can do this with just your eyes. You do not want to frustrate yourself so much you want to throw your binoculars into the nearest lake!
Fogged-up Binoculars. You can get fog-proof binoculars. I have never used these, but they are supposed to be excellent for birding – especially at dawn or in cold weather. It is disappointing – and aggravating – to leave your nice warm house, apartment, or car on a frosty morning, and find you have to wait 5 minutes or more before you can see through your fogged up binoculars! When I know I am going birding on a cold day, I often put my binoculars in the car parked in our unheated garage to acclimate. Then when I do start birding, they are ready to use.
You are Unable to Use Binoculars: If you have not been able to use binoculars, I do have a few suggestions:
- Do not rest the binoculars anywhere on your face. Hold them about half an inch or so away from your eyes. Try looking at a far distant object and see if you can focus so the object is clear. If that does not work …..
- Rest the binoculars either on your upper cheek bones which are just below your eyes or lean them against the bone above each eye – at your eyebrows. One or the other. Depending on which resting place you choose, tilt your binoculars either slightly upwards or downwards. Look at a distant object and try to focus.
- If you wear bifocals, using binoculars may be impossible. If you wear graduated bifocals, depending on how much the gradation changes in your lenses, you will probably be able to use binoculars. Rest the binoculars right on your lenses and move them around a bit – trying to bet the binoculars focused at each place. If you are able to focus the binoculars so you see a clear image, remember just where on your glasses you placed the binoculars.
I have been successful in explaining and showing many people how to use binoculars, but there have been a few who simply could not use them. If this happens to you, do not give up – it just means binoculars are not for you. I would recommend trying a scope. Using a scope involves closing one eye and looking through the lens with the other eye, so a different set of skills. If neither binoculars nor a scope works for you, then you can still become a good birder by learning songs and call notes. When Cleon and I tracked specific grassland species for our conservation district for ten years, we did almost all of it by ear – these birds spent most of their time down within the grass and we never saw them. We got good and reliable counts just by listening. And remember, if you are birding in the woods, it will also be less common to actually see the birds, but you will hear them. So don’t give up!